10 Creative Projects Featuring Eye-Catching Large Decorative Buttons

In the world of crafting and DIY projects, small details can make a big impact. And when it comes to adding charm and style to your creations, large decorative buttons are an absolute game-changer. From fashion accessories to home decor items, these eye-catching buttons have the power to transform any project into a stunning masterpiece. In this article, we will explore 10 creative projects that showcase the versatility and visual appeal of these oversized embellishments. Whether you're a seasoned crafter or just getting started on your creative journey, join us as we delve into the wonderful world of large decorative buttons and discover new ways to elevate your handmade endeavors.
Stylish Statement Necklaces: How to Create a Bold and Beautiful Piece Using Large Decorative Buttons
Creating your very own statement necklace using large decorative buttons is an easy and fun DIY project. With just a few materials and some simple steps, you can design a unique piece that will add flair to any outfit.
To get started, gather your supplies: large decorative buttons of various shapes and colors, jewelry chain, jump rings, lobster clasp, pliers, and wire cutters. Choose buttons with interesting designs or textures that match your personal style.
Start by arranging the buttons in a pleasing pattern on a flat surface. Once you're happy with the arrangement, use jump rings to attach them together. Connect the ends of the button arrangement to the jewelry chain using more jump rings. Finally, add the lobster clasp to one end of the chain for easy closure.
Now you have a stunning statement necklace that's both bold and beautiful! It's perfect for dressing up any casual outfit or adding an extra touch of elegance to formal attire. So go ahead and unleash your creativity – wear it proudly!
Button-Embroidered Throw Pillows: Adding a Pop of Color and Texture to Your Living Space
Enhance the coziness of your living space with our button-embroidered throw pillows. These eye-catching decorative pillows feature large, vibrant buttons that instantly add a pop of color and texture to any room. Whether you're looking to refresh your sofa or spruce up your bed, these unique throw pillows are sure to make a statement.
Crafted by expert artisans, each pillow is meticulously embroidered with high-quality thread and adorned with an assortment of large decorative buttons. The combination of different textures creates visual interest and makes these pillows stand out from the rest. Add them as accents on your couch or mix them in with other cushions for an eclectic touch – the possibilities are endless.
With their intricate designs and attention-grabbing buttons, our button-embroidered throw pillows will bring character and warmth to any corner of your home. Don't settle for ordinary – upgrade your decor today!
DIY Button-Adorned Tote Bags: Fashionable and Functional Accessories for Everyday Use
Upgrade your everyday tote bags with a touch of style by adding eye-catching large decorative buttons. This simple DIY project is perfect for those looking to add a unique flair to their accessories while keeping them functional.
Materials Needed:
- Plain canvas tote bag
- Large decorative buttons in various colors and designs
- Needle and thread or fabric glue
Instructions:
- Choose your desired design and layout for the buttons on the tote bag.
- If using a needle and thread, carefully sew each button onto the bag using strong stitches that will securely hold them in place.
- If using fabric glue, apply a small amount onto the back of each button before pressing it firmly onto the bag.
- Allow the adhesive to dry completely before using the tote bag.

By following these simple steps, you can create stylish and personalized tote bags that are both fashionable and functional. Whether you choose to adorn your bag with vibrant floral buttons or opt for sleek metallic designs, this DIY project is sure to make a statement wherever you go. So grab your supplies, unleash your creativity, and transform ordinary tote bags into stunning fashion accessories!
Button-Accented Headbands: Elevate Your Hair Accessories Game with These Chic Designs

Upgrade your hair accessories collection with these stylish button-accented headbands. Perfect for adding a touch of flair to any outfit, these chic designs are sure to turn heads. Whether you're dressing up for a special occasion or simply want to elevate your everyday look, these headbands will take your style game to the next level.
From bold and colorful buttons to delicate beaded accents, there is a design for every taste and preference. Choose from sleek satin bands adorned with shimmering rhinestones or opt for a more bohemian vibe with woven fabric designs embellished with wooden buttons. Whichever style you choose, you can't go wrong with these trendy accessories.
Pair them with jeans and a T-shirt for an effortless casual look or wear them as the perfect finishing touch to an evening ensemble. With their versatility and eye-catching appeal, button-accented headbands are guaranteed to become your new go-to accessory. So why wait? Start elevating your hair game today!

Button-Embellished Wall Art: Creating Unique and Eye-Catching Decor for Your Home
Adding large decorative buttons to your wall art is a fun and creative way to make a statement in your home. Whether you have a blank canvas, a framed picture, or even a wooden plank, you can easily transform it into something unique by adorning it with eye-catching buttons.
Here are some simple steps to create your own button-embellished wall art:
- Gather the materials: To get started, you'll need a piece of artwork as your base, large decorative buttons in various shapes and colors, adhesive glue suitable for craft projects, and any additional embellishments like beads or ribbons.
- Plan your design: Before attaching the buttons to the artwork, take some time to plan out the design. Consider arranging them symmetrically or creating an abstract pattern for added visual interest.
- Attach the buttons: Use the adhesive glue to attach each button carefully onto the surface of your artwork according to your chosen design. Make sure they are securely fastened and evenly spaced apart.
- Add extra details: If desired, enhance your button-embellished wall art by adding extra details such as pearls or sequins around the buttons using small amounts of glue.
- Let it dry: Allow sufficient time for the glue to dry completely before hanging up or displaying your newly created button-embellished wall art in your home.

By following these easy steps, you can create beautiful and personalized pieces of decor that will undoubtedly catch everyone's attention while adding charm and color to any room in your house.
Button-Covered Picture Frames: Personalize Your Memories with a Touch of Button Magic
Adding a unique touch to your picture frames is as easy as 1, 2, 3 with this fun and creative project. By covering the frame in eye-catching large decorative buttons, you can instantly transform an ordinary frame into a work of art. This simple yet effective technique allows you to personalize your memories while adding a touch of button magic.
To get started on this project, gather the following materials:
- A plain wooden or plastic picture frame
- Eye-catching large decorative buttons in various shapes and colors
- Strong adhesive or hot glue gun
- Scissors
Once you have everything ready, follow these steps to create your button-covered picture frame:
- Clean the surface of the frame thoroughly to ensure that it is free from dust and debris.
- Select the buttons you want to use and arrange them in a pattern or design that appeals to you.
- Apply adhesive or use a hot glue gun to secure each button firmly onto the surface of the frame.
- Allow ample time for the adhesive to dry completely before handling or displaying your newly transformed picture frame.
With just a few simple steps, you can turn an ordinary picture frame into something truly eye-catching and unique by adding large decorative buttons. Whether displayed at home or given as a gift, these personalized frames are sure to bring joy every time they're looked at!
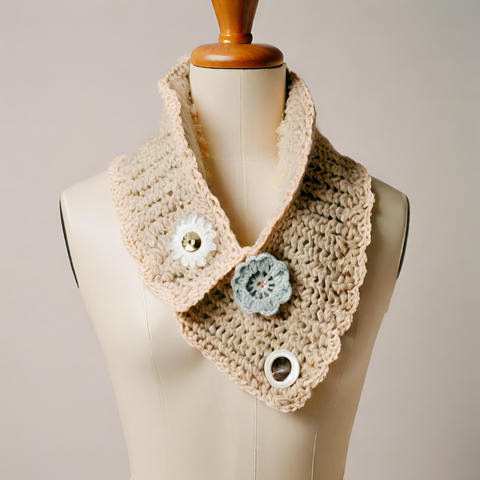
Button-Embellished Scarves: Stay Warm and Stylish with These Winter Fashion Must-Haves

Transform your winter wardrobe with button-embellished scarves. These versatile accessories not only keep you warm but also add a touch of style to any outfit. Here are some creative project ideas that feature eye-catching large decorative buttons:
- Knitted Button-Up Scarf: Knit a cozy scarf using chunky yarn and add large, colorful buttons along the edges. This simple yet elegant design adds a unique flair to your winter look.
- Buttoned Infinity Scarf: Use soft, patterned fabric to create an infinity scarf that loops around your neck effortlessly. Secure the ends with oversized decorative buttons for an extra dose of charm.
- Button-Accented Crochet Scarflette: Crochet a snug scarflette using variegated yarn and embellish it by sewing on large decorative buttons at strategic intervals. This trendy accessory is perfect for layering over sweaters or jackets.
Stay warm and fashionable this winter season by incorporating these button-embellished scarves into your wardrobe rotation.
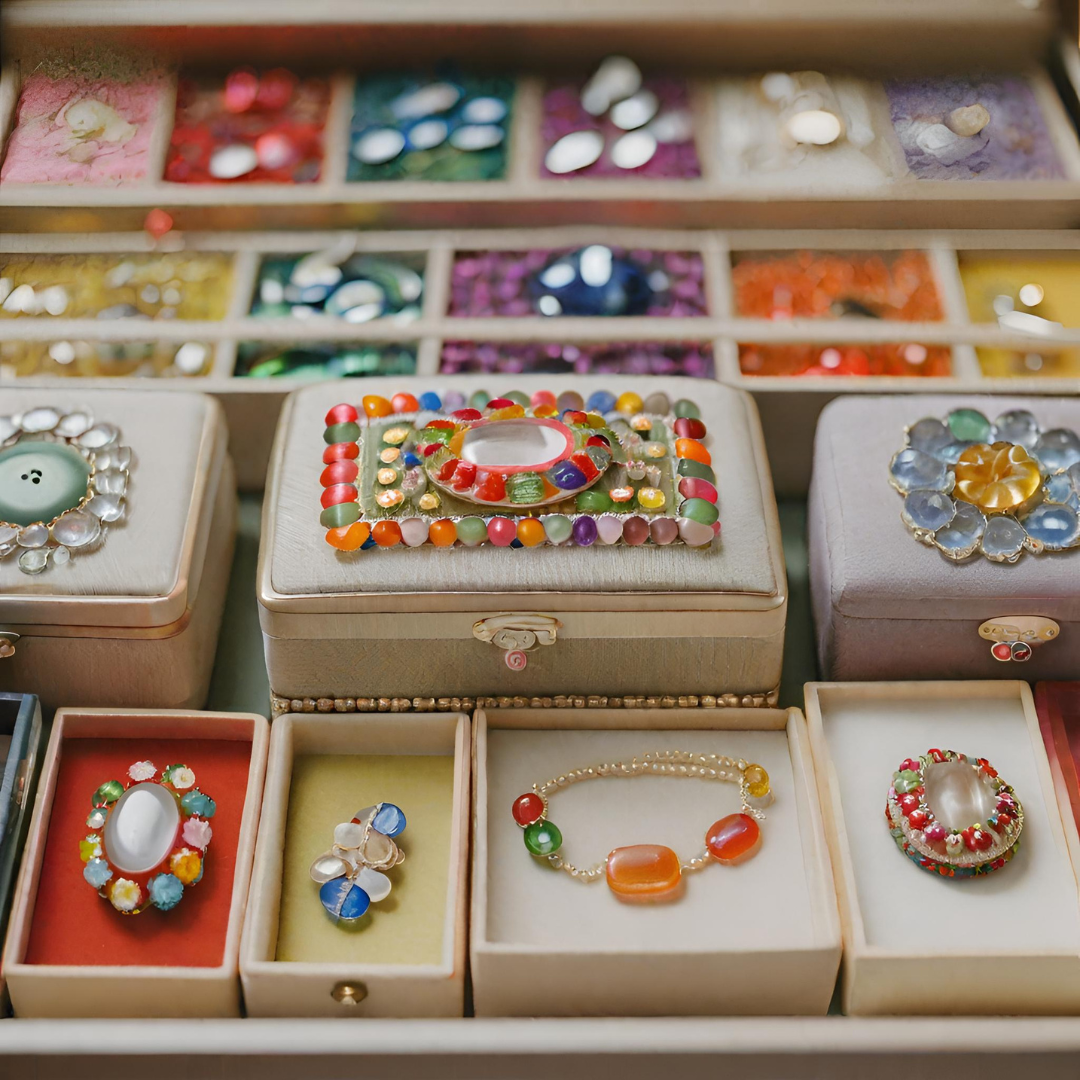
Button-Encrusted Jewelry Boxes: Transforming Ordinary Containers into Stunning Keepsakes
Transform any ordinary jewelry box into a stunning keepsake with the simple addition of large decorative buttons. With their vibrant colors and unique designs, these buttons add a touch of elegance and creativity to an otherwise plain container. Whether you are repurposing an old box or starting from scratch, this project is sure to impress. 
To get started, gather your materials: a jewelry box (wooden or cardboard), large decorative buttons in various shapes and colors, hot glue gun, craft paint (optional), and clear acrylic sealer spray. If desired, paint the entire box in a coordinating color before beginning the button application process. Allow the paint to dry completely before moving on.
Next, arrange your buttons in a pleasing pattern on top of the lid of your jewelry box. Play around with different layouts until you find one that suits your personal style. Once you have finalized the design, use the hot glue gun to affix each button firmly in place. Be careful not to use too much glue as it may seep out from underneath the buttons.
Once all the buttons are securely attached, gently wipe away any excess glue using a damp cloth. This will ensure that your finished product looks neat and polished. Finally, apply two coats of clear acrylic sealer spray evenly over all surfaces of the completed button encrusted jewelry box.
Button-Trimmed Home Decor: Adding a Playful and Whimsical Touch to Your Living Space
Enhancing your living space with button-trimmed home decor is a fun and creative way to inject personality into your surroundings. Large decorative buttons are versatile, offering endless possibilities for adding charm and visual interest.
-
Pillows with Button Accents:
Transform ordinary throw pillows into eye-catching statement pieces by adorning them with large decorative buttons. Whether you opt for a single oversized button or a cluster of smaller ones, the addition of buttons instantly elevates the design of any pillow. Experiment with different colors, textures, and shapes to create unique combinations that complement your decor.
-
Curtain Tiebacks:
Give your curtains a playful touch by using large decorative buttons as tiebacks. Simply attach coordinating ribbons or cords to the back of each button, then use them to hold back curtain panels in an elegant yet whimsical manner. This simple DIY project adds instant charm to any window treatment and can be easily customized to suit your style preferences.

-
Picture frames:
Add flair and personality to plain picture frames by attaching large decorative buttons around their edges using adhesive glue or small nails. The buttons act as miniature sculptures that draw attention to cherished photos or artwork displayed within the frame. Mix and match colors and sizes for an eclectic look, or stick with a monochromatic scheme for a more streamlined aesthetic.
Button-Adorned Greeting Cards: Handmade Designs That Are Sure to Make a Lasting Impression
Crafting greeting cards is a delightful and creative way to show someone you care. Adding large decorative buttons to your handmade designs takes it up a notch, creating truly eye-catching and memorable cards.
Why Use Large Decorative Buttons?
- Visual appeal: Large decorative buttons instantly grab attention with their vibrant colors and unique shapes.
- Texture: The tactile element of buttons adds an extra dimension to your greeting cards, enticing recipients to touch and explore.
- Versatility: With countless button designs available, you can easily find ones that match the theme or sentiment of your card.
- Easy customization: Buttons can be sewn on or glued in place, allowing for endless possibilities in design placement.
How to Create Button-Adorned Greeting Cards
- Begin by selecting blank greeting card stock or folding paper for your base.
- Choose a large decorative button that complements the style of your card and consider any additional embellishments you may want to include (such as ribbon or glitter).
- Experiment with different layouts before committing – try positioning the button vertically along one edge, off-center for asymmetry, or even at an angle.
- Once you're satisfied with the placement, secure the button using thread if sewing or adhesive if gluing.
- Complete your design by adding personalized messages inside the card.

By incorporating large decorative buttons into your greeting cards, not only will recipients appreciate receiving such unique creations but they'll also cherish these handcrafted keepsakes long after opening them!